My sister's expecting a baby in August.... her 4th GIRL!
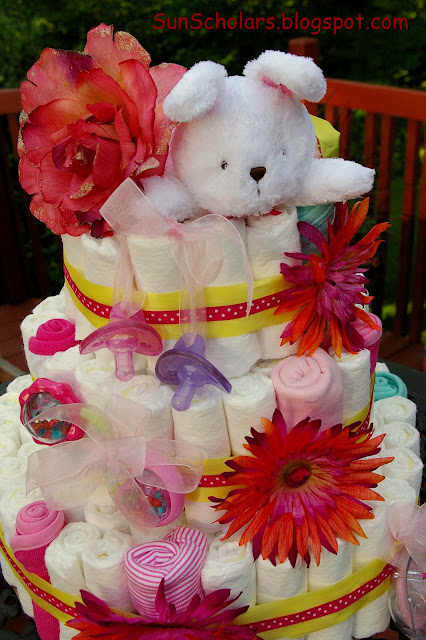
A perfect excuse for me to finally make one of these diaper cakes that I've been admiring for a couple of years now. So here you have it...
I was thrilled with how it turned out, and that it really wasn't that difficult to put together.
There are SO many tutorials for diaper cakes out there, that I really wondered if I should bother adding my own.
Hmmm.....
Yeah, I think I will.
My diaper cake contains the following:
(Keep in mind, you can add or omit pretty much anything you like.)
- About 145 Size 1 Diapers
- 6 Baby Wash Cloths
- 4 Onsies
- 1 Hooded Towel
- 4 Flannel Receiving Blankets
- 1 Bottle of Baby Shampoo/Baby Wash
- 1 Tube of Diaper Rash Cream
- 2 Sets of Baby Nail Clippers
- 4 Pacifires
- 1 Super Soft Blanket Toy
- 1 Baby Rattle
Other Supplies Used:
- Ribbon
- Curling Ribbon
- Rubber Bands (about 220)
- Silk Flowers
- Glue Gun & Hot Glue
- Cardboard (Many people use a cake tray instead)
- Cellophane (not pictured, but I used this to wrap the diaper cake up when finished)
Directions
Step 1: Get Rolling!
Begin by rolling each of the diapers you intend to use in your diaper cake. I thought it would be easiest to secure them with rubber bands than with ribbon like I've seen some people suggest. Begin rolling on the open end of the diaper, with the back-side of the diaper facing up. Tightly roll all the way to the end, and secure with a rubber band.


Next, roll some of your smaller items that you can closely match to the size of your rolled diapers. Here you see the set of baby wash clothes all rolled.
I folded the onsies so that I could roll them to a similar size as well.


Once everything is rolled, you can begin forming your cake!
Step 2: Form Your Cake Base!
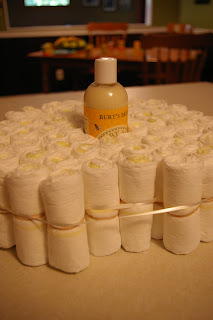
Ok... so this may seem really strange, but I found it quite helpful to use my spring form pan to help me get started. You want to choose a taller item for the middle to add some stability to your cake (and allow you to attach the next layer). I used a bottle of baby shampoo here. I then began to tuck my rolled diapers in around the bottle until everything seemed nice and snug.
I tied a piece of curling ribbon around the diapers and knotted it tightly, removed the beginning of my cake from the pan, and added another layer of diapers to those I'd already secured together. I was working with so many diapers, that this just made it easier to keep them all in place without whipping out the glue gun (which I would have SO DONE had it not rendered the diapers totally useless for my sister at that point).
For the outer layer of diapers I added in a onsie and a couple of the was clothes, to add some color to the cake. Again, I secured the entire layer by wrapping a couple lengths of curling ribbon around the middle and knotting tightly. My bottom layer had 91 diapers, 1 onsie, 2 washcloths, and the bottle of shampoo.
I decided to hide my hooded towel and receiving blankets inside the diaper cake. So I rolled each of these into similar heights, and tightly secured them around the shampoo bottle from the center of my cake base. I had to stick an extra diaper into the middle of these to make up for the extra height above the bottle in the center of them all.
Once you have your middle in place, you can begin adding your diapers and other small, rolled items around them. Again, you will tightly secure them in place using a couple lengths of curling ribbon around the middle.
My second layer had 33 diapers, 2 onsies, and 2 washcloths around the center blankets and hooded towel.
Step 4: Top it Off!
Before I added diapers to the top layer of my cake, I stuck some of the smaller items inside. I added diaper rash cream and some nail clippers.


And... just as before... add your rolled diapers and other rolled items around until you are happy with the size. Secure with a couple lengths of tightly knotted curling ribbon.
Step 5: Decorate It!
If you ask me, this is the fun part!!!
I decided to use this yellow ribbon to wrap around the middle of each layer on the cake. It hid the rubber bands and the curling ribbon, and gave some nice color. I used hot glue to secure the two ends together.
I then used hot glue to add a thinner ribbon to the middle in a nice contrasting color that matched some of the items I used in the diaper cake.
I had some left over silk flowers from another project which looked so cute. I hot glued these to the ribbon, and used a softer, light pink ribbon to tie the other items to the diaper cake (the rattle and pacifiers). We stuck the little blanket toy on top with another silk flower.
Step 6: Add Some Support!
Yeah.. you could do this first. I chose to do it last because I didn't want my base to dictate the size of my diaper cake. I wanted to get as many diapers in there as I could. So I slid my cake onto a large square of cardboard from a box I had on hand. I traced around my cake, and cut the cardboard to shape.
And here you have it!


And, in case you were curious, my sis loved it :)
Hope you do too!


No comments:
Post a Comment