Popular Posts

Coming Soon - For the Kids Friday Link Party!


I am SO excited to announce my very own link party, which will officially kick off this Friday, March 4th.  I have loved participating in the various link parties on the web.  What a great way to share all of the wonderful ideas you are all coming up with!  However, I want to put a slightly different spin on this one.

The Fun for Kids Fridays party will be a link party to share ideas, activities and recipes for children.  If it is something that children can make, do, or participate in, even better!  What craft projects, educational activities, family traditions, or ways of simplifying life with kids, have you come up with?

More details to come Friday, so stay tuned!  I am excited to see what you will have to share!

St. Patty's Day Fun


St. Patrick's Day is a very special day in our home.  No, we aren't Irish... but it is the same day that my hubby and I met about 14 years ago.  So we like to find ways to make the day special.  Now that our kids are getting older, it is fun to find ways to make it special for them too.

So here are some of the things we've been up to...

Hanging, Sparkly Shamrocks


We made these shamrocks to hang in the window, which the kids had a lot of fun making.  We followed the directions for the Stained Glue Valentine Hearts found at HolidayCraftsAndCreations.com, HERE.

We used green yarn in place of string, and added lots of green glitter to the top of the glue.  I hung them with fish line.

Just note, it took our shamrocks a couple days to completely dry... and we are in the dry winter here in the Midwest.  So prepare your kids for a long wait to enjoy their creations!
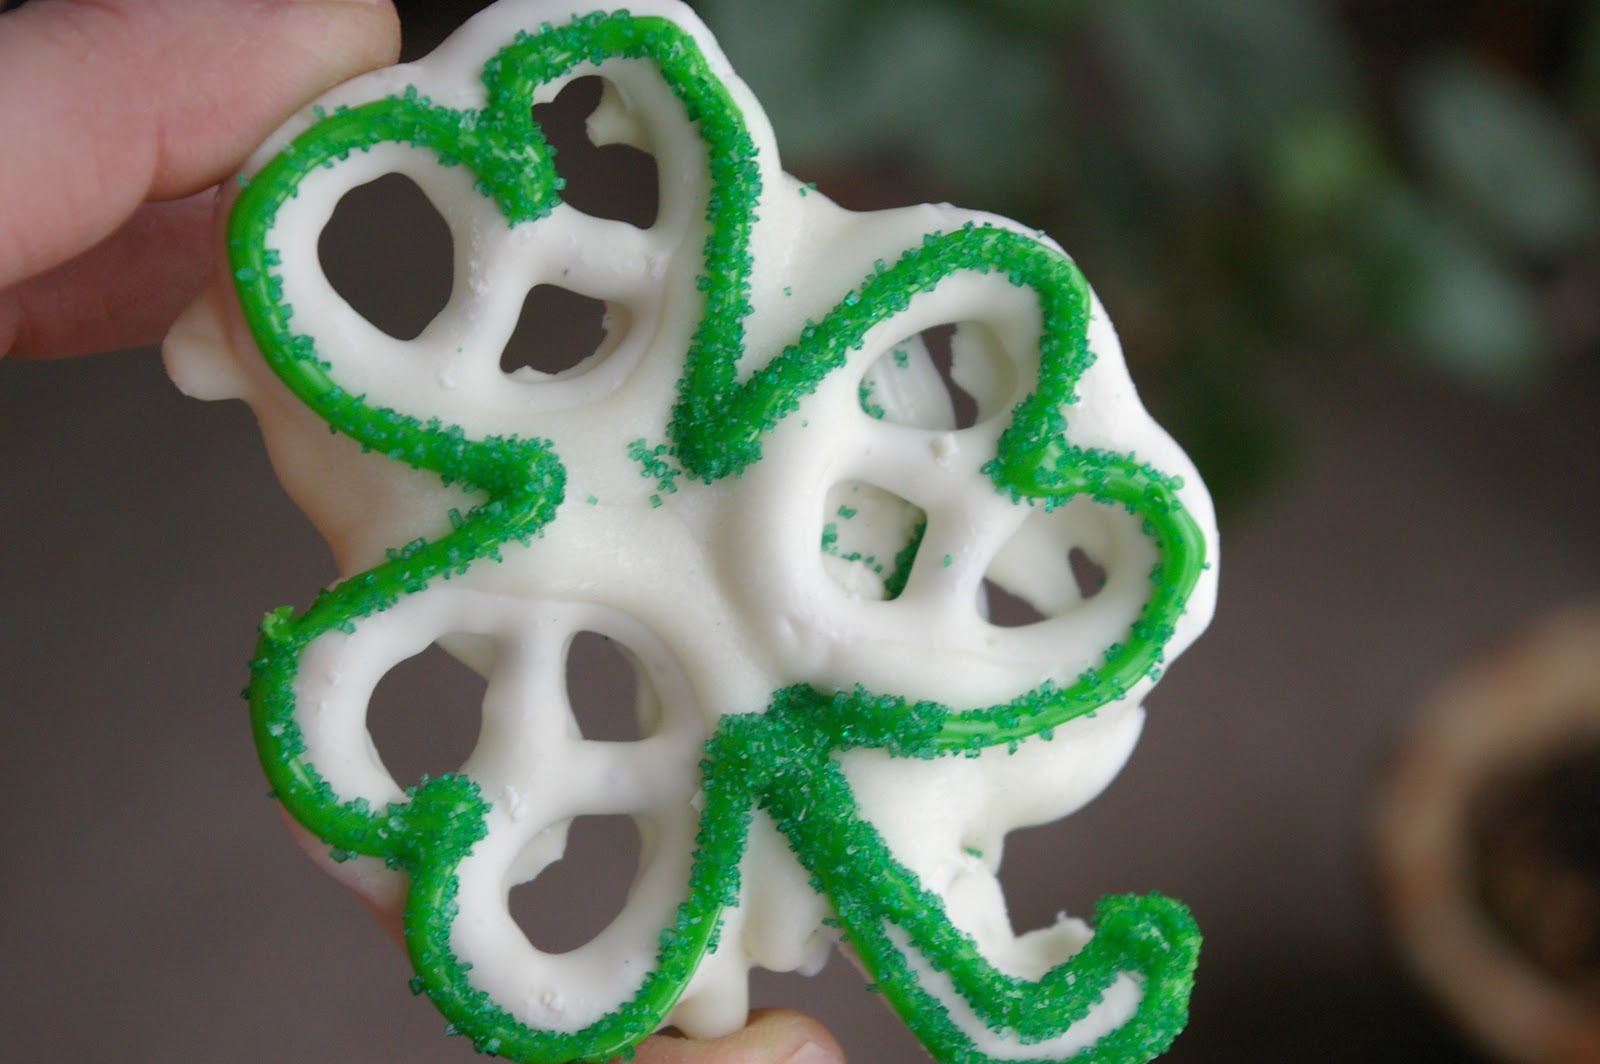

Shamrock Snacks


Aren't these cute?!  I came across the idea in the March 2011 issue of Family Fun Magazine.  I couldn't wait to try these with the kids.  HERE is the link to the FamilyFun.com directions.  However, I've outlined them with photos below :)

Ingredients:
- Pkg of Yogurt Pretzels
- White Chocolate Chips (I used about 1/2 a bag, or 1 cup)
- Green Frosting (I made my own, using a great recipe from Allrecipes.com found HERE)
- Green Sprinkles

Directions:
1)  Place about 1/2 cup of white chocolate chips in a glass dish, and microwave for 30 seconds at about 50% power.  Stir.  Do this two or three times, until you are able to completely melt the chips.  DO NOT OVER HEAT!

You should be able to stir the chocolate smooth and free of lumps.

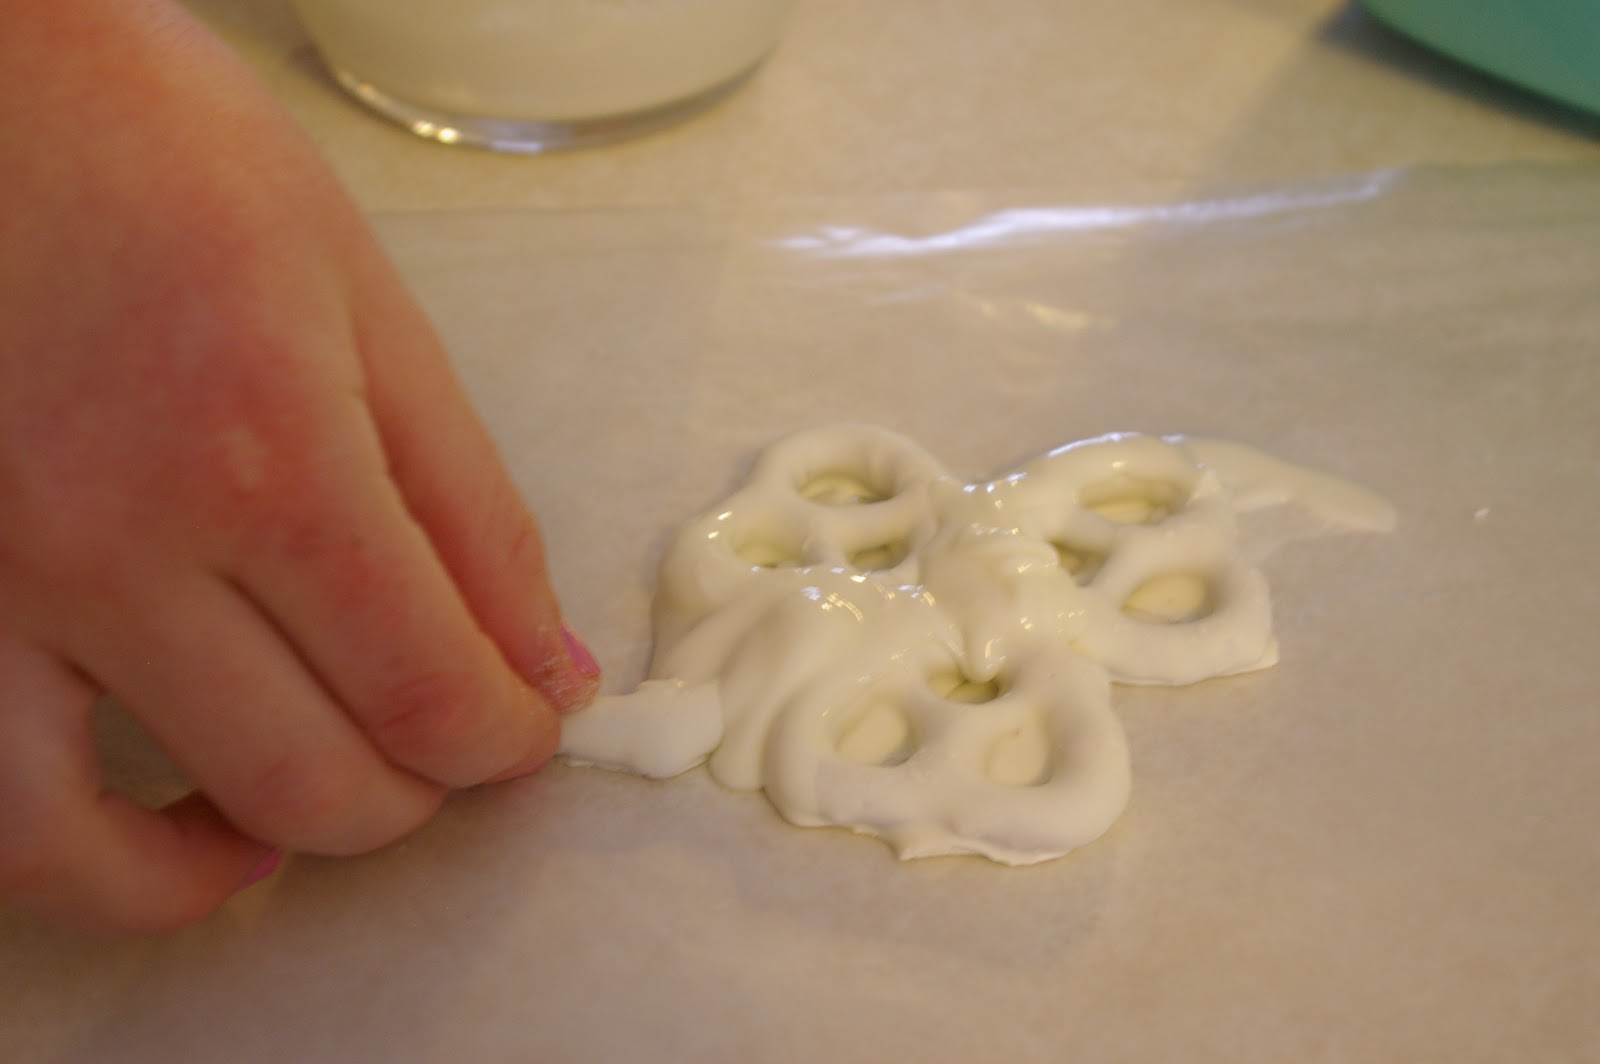
2)  Line a surface or baking sheet with wax paper.

3)  Dip the bottom half of a pretzel in the melted chocolate, making sure each side is nicely coated.  Place the pretzel onto your wax paper.

4)  Repeat Step 3 with the second and third pretzels, laying each to form the shape of a shamrock.

5)  If you have broken pretzels, you can use them for the stem of your shamrock.  If not, you can carefully cut pretzels like we did below.

 6)  Dip the end of the shamrock stems into the melted chocolate, and put into place on the wax paper.

 Here is what your shamrocks will look like when assembled.  Some of them, we chose to lay the stem flat, while others (like this one below) we had placed so that it stood off of the wax paper.

And we thought we'd try to to make some four-leaf clovers while we were at it... of course, right?

7)  Time to mix up some frosting!  I used a great Sugar Cookie Icing recipe from Allrecipes.com, found HERE.  I like this frosting because it sets hard, and is easy to whip up.  I doubled the recipe, and found that I had twice as much frosting as I needed.  So if you use one package of yogurt pretzels, you can expect to follow the recipe as it is written.
Icing Recipe:
- 1 cup powdered sugar
- 2 tsp milk
- 2 tsp light corn syrup
- 1/4 tsp almond extract (or vanilla)
- we added green food color

I added it to a piping bag with a small tip, but you could just as easily use a Ziploc bag and cut a small tip off of the corner.

8)  Outline your shamrocks with the icing.  Add your sprinkles soon after, before the frosting begins to set!


And there you have it!  A fun St. Patty's day snack!

We ended up with 18 shamrocks, using all of the pretzels that came in the package.  Not too difficult, and the kids were able to join in.  We give this one a thumbs up!

Bustle Skirt

I came across this skirt a few days ago, and just HAD to make one for my girls.  I managed to get one finished last night, and my youngest daughter couldn't wait to get it on.  How cute is that?!

Find the tutorial for the Bustle Skirt HERE, by Elizabeth Evans at Simple Simon & Co.

I made a trip to the fabric store, on the hunt for the perfect fabric, and found this dusty pink polyester/spandex blend.  I don't know a lot about fabrics, but this one had a nice weight to it and looked like it wouldn't fray too much.

I bought 4 yards of fabric and had enough for two skirts - one being a size 4 skirt and the other a size 7/8 skirt.

The only change I made to the directions, was that I did not flip my top row of circle petals upside-down.  I was worried that they would not flop down nicely considering the fabric.  Other than that, I followed all instructions.


You can see, Tatum loves the result!  Thanks for a great Tutorial Elizabeth!

Five Minute Flower Clip Tutorial


Like my Five Minute Flower Headband, this adorable flower clip can be made in 5 minutes, even for the non-crafter!  My girls LOVE wearing these big flowers.  You can find them in the floral section at craft stores, such as Michaels.  Look for the flowers that aren't too bulky, have a nice look to them, and aren't too big.


Supplies Needed:
-  Silk Flower
-  Felt, about 2" square in any color
-  Metal Hair Clip
-  Needle and Thread
-  Hot Glue Gun & Glue Sticks

Directions:

1)  Remove the flower from the stem.


Notice that there is some extra greenery/bulk still remaining on the back of the flower.  In this case, it was not glued to the petals, and I was able to remove it all without damaging the flower.

2)  Carefully cut the extra plastic that is protruding from the back of the flower.

3)  Add some hot glue to the end you just cut.  The center holds all over your flower petals together, so you want to secure it.

4)  Cut an oval from your felt.  I cut an oval about about 2" in diameter by 1 1/2" in diameter.

5)  Add a line of hot glue down the center of your oval (across the shorter side).  Open your hair clip, and close it so that that the felt circle is glued to the "top" side of the clip.  Notice in the photo on the right, the felt is attached to the top of the clip when it is opened. 

6)  Add hot glue to the top side of your felt oval and the top of the hair clip, covering it well.  Carefully place the glue-side of the oval on the center, backside of the flower.  Press down gently, making sure not to get burnt by the glue through the felt!  You may want to flip the flower over and gently press from the top down, to secure it.
Make sure that you place the clip "handle" in a place on the flower that you will be able to access fairly easily.


NOTE:  You may want to go into the flower, between the layers of petals, and add some hot glue into the center of the flower.  This will give it some extra security, and minimize the risk of your flower coming apart.

And that is it!!!  So simple and lots of fun!


Five Minute Flower Headband Tutorial


This adorable headband can be made in 5 minutes, even for the non-crafter.  My girls LOVE wearing these big flowers.  You can find them in the floral section at craft stores, such as Michaels.  Look for the flowers that aren't too bulky, have a nice look to them, and aren't too big.

Supplies Needed:
-  Silk Flower
-  Felt, about 2" square in any color
-  Elastic (I believe mine was 1/4" or thicker, black, and about 20")
-  Needle and Thread
-  Hot Glue Gun & Glue Sticks

Directions:

1)  Remove the flower from the stem.  I normally would remove the extra green on the flower, but in this case, it was well glued to the petals.  If you have extra green bulk here that can easily be removed without damaging the flower, I would do so.  (See my instructions for the Five Minute Flower Clip for an example.)

2)  Carefully cut the extra plastic that is protruding from the back of the flower.

3)  Add some hot glue to the end you just cut.  The center holds all over your flower petals together, so you want to secure it.

4)  Measure the head you are making the headband for.  You will want to cut your elastic to a length that fits comfortably around the head, making sure you have some overlap to sew it together.

5)  Hand sew the elastic into a loop.  Make sure it isn't twisted before you begin to sew.  I used white thread here so you can see.  This does not have to be perfect, or look good for that matter.  No one will ever see it :)


6)  Cut a circle from your felt.  I used a circle about 2" in diameter.

7)  Hot glue the headband to the back of your flower, adding glue to the elastic where you had sewn the ends together.  That way you can hide your stitching. 


8)  Add hot glue to one side of your felt circle, covering it well.  Carefully place the glue-side of the circle on the backside of the flower, covering up the elastic band.  Press down gently, making sure not to get burnt by the glue through the felt!  You may want to flip the flower over and gently press from the top down, to secure it.

NOTE:  You may want to go into the flower, between the layers of petals, and add some hot glue into the center of the flower.  This will give it some extra security, and minimize the risk of your flower coming apart.

And that is it!!!  So cute!


Sunflower Cupcakes

One of our family traditions is to celebrate our children's half birthdays.  We don't go all out as we would for the actual, big day, though we do make a special cake and sing "Happy Half Birthday".  This weekend we are celebrating my daughter's 7 1/2 birthday.  She had requested these Sunflower Cupcakes I had made for her birthday a couple of years ago.  I was so happy with these, and thought it would be fun to make them again.


Aren't they cute?  Let me again stress... I love to cook and bake, though I am not an expert in this department.  I had made these with the instructions found in the amazing cupcake book, Hello Cupcake, by Karen Tack and Alan Richardson.  They were so easy to make, even for a wanna-be pastry queen like myself!

This time, however, I had to do from memory.  I wasn't as happy with the end result as I was in the image above, but they did turn out cute.  The main problem, I believe, was that I chose the wrong frosting for the flowers this time.  I made buttercream frosting from scratch.  Perhaps not the best choice?  Or... perhaps I was too eager and made it from butter not fully at room temperature, so it didn't turn out nice and smooth like it should?  Ack... you tell me!  Oh well... the kids won't care.


My ingredients this time:
-  Chocolate Cake Mix (prepared 18 cupcakes)
-  Oreo Cookies
-  Mini Oreo Cookies
-  Store-Bought Buttercream Frosting
-  Chocolate Chips
-  Red M&M's
-  Food Coloring (Red, Yellow and Green... not shown)
-  Piping Bag and Leaf Tip (though the first time I made these I used a Ziploc bag that I had cut the end off of... worked perfectly fine.
-  Frosting for the Flowers (I prepared butter cream from scratch... not sure if that was the best choice)

** This time I believe I made smaller cupcakes (so less room for flowers on top), and omitted the green leaves from fruit roll-ups.  They were a pain to mess with, I thought.

Another note - Do not do these too far ahead of time.  I found that the frosting caused the Oreo cookies to get soggy when left to sit for too long.


Directions:

1)  Prepare your cupcakes, and let them completely cool.

2)  Make your lady bugs!  I melted some chocolate chips in a glass dish, 30 seconds at a time on medium heat, stirring well in between.  Then, using a toothpick, I carefully drew the chocolate onto the M&M's.


 3)  Color some frosting green to be used as the base of your cupcakes.  This is where I used the store-bought frosting.


4)  Generously frost your cupcake tops.


5)  Place an Oreo on each cupcake.


6)  Prepare your sunflower petal frosting.  Color it yellow, divide a portion of that into a smaller bowl to add some red... so you end up with an orange frosting as well. 


7)  Place your frostings into your piping bag (or a Ziploc bag).  If using a piping bag, select the tip for making leaves (it has a 'v' cut end).  Otherwise, you can cut a small 'v' out of the corner of your Ziploc bag.  I tried to place the orange on one side, and the yellow on the other so that it blended as I piped.
Another note... I found that the frosting would warm up after being held for a while, and the results weren't as nice.  I'd recommend using smaller portions of frosting at a time to avoid this.  You'll get nicer petals in the end.


 8)  Begin piping petals around the lower perimeter of each Oreo Cookie.  You might want to practice forming your leaves before getting started.


9)  Add a second row of petals above the first.  It looks best if you can add these between the petals on the first row.  I found that this time, I was inserting the tip into the "stuffed" part of the Oreo for my second row of petals.  If you notice the finished picture above, I may have done my first row here and the second row on top of the cookie.  Do whatever you think looks best.


10)  Add your Mini Oreos.  You'll likely have room for two of these on a regular cupcake.  I opted for one this time.

11)  Repeat Steps 8 and 9 for the Mini Oreos.

12)  Use a little frosting to secure your little lady bugs.


And.... Your cupcakes are complete!  Enjoy!!!