Popular Posts

Postcard Valentines


This Valentine is my own little creation.  You can do this one with our without a sewing machine, though if you are making a stack of them, you might want to have one on hand.  These could just as easily be hand sewn.  If you aren't a sewer, try using double-sided tape or glue!

Supplies Needed:
-  Card Stock, cut into 3-1/2" x 5" rectangles
-  Wax Paper, cut into 3-1/2" x 5" rectangles
-  Markers or Pens
-  Sewing Machine & Thread... OR Needle & Thread, Double-Sided Tape, or Glue
-  Valentine Stickers (optional)
-  Valentine Candies

Instructions:


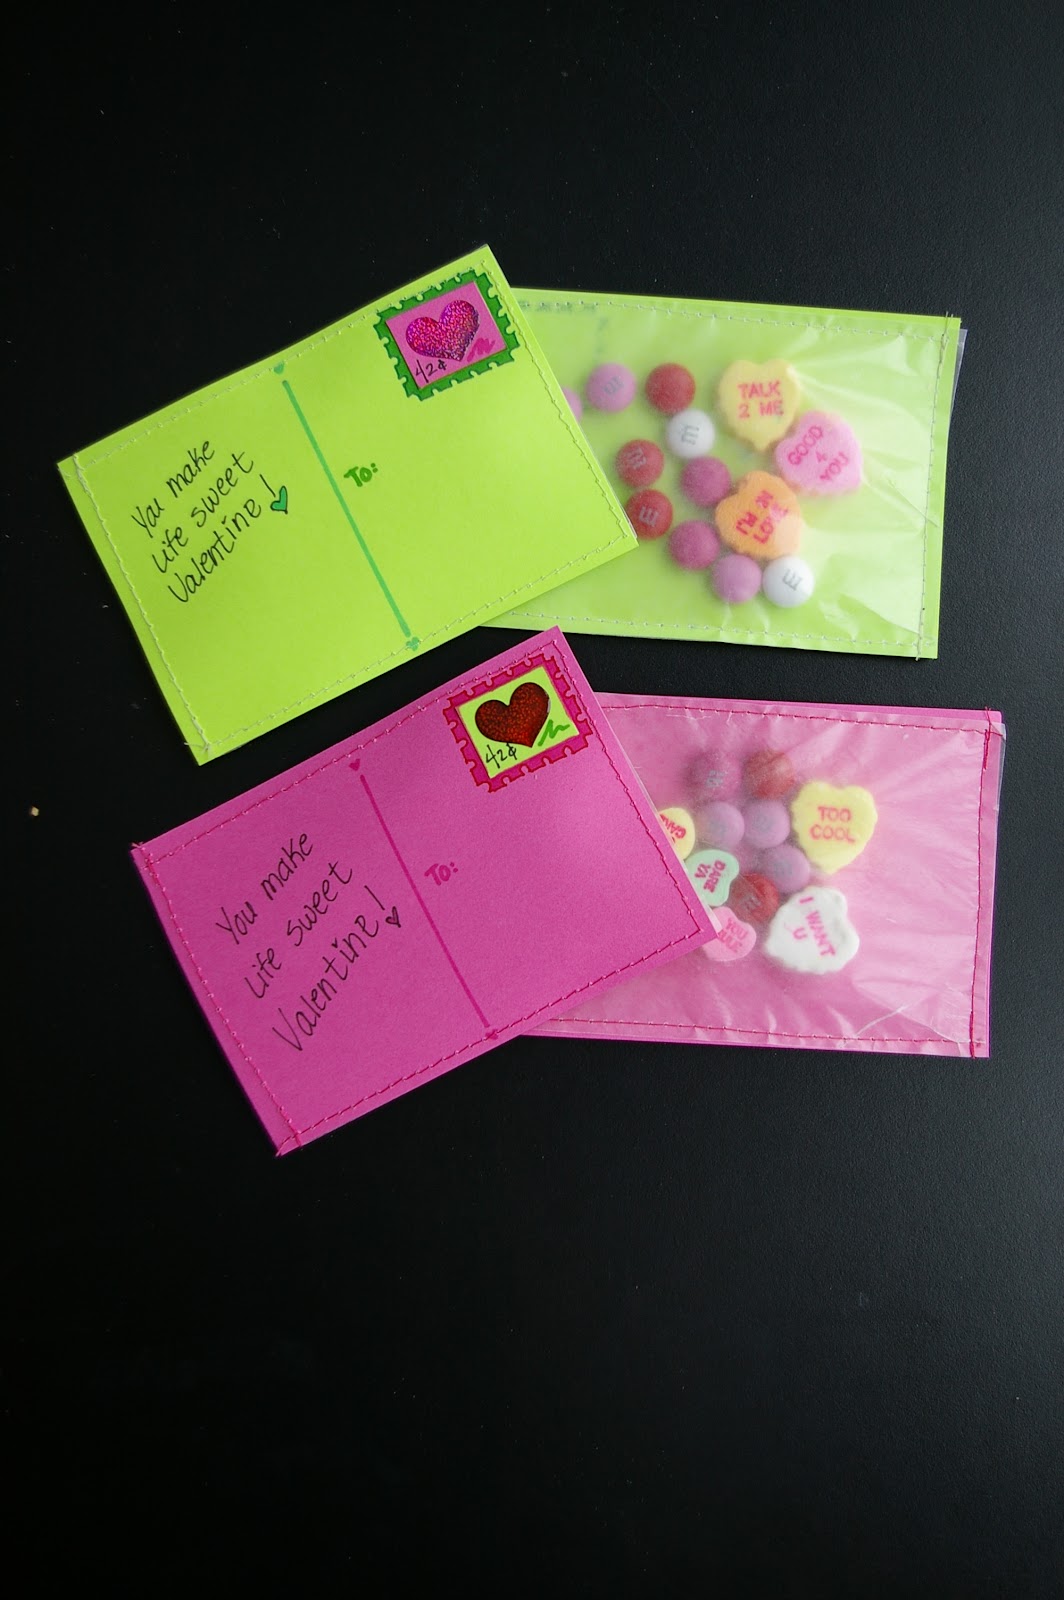
1)  Once your cards have been cut, create your postcard.  I drew a line down the middle, separating the address section from the message, and made a stamp using card stock, a heart sticker and markers.  You might also want to add your message on your post cards at this point (so you are not having to write on them after they are full of candies).

We used pink cards for the girls and green cards for the boys.


2)  Next, placing a wax paper rectangle behind your postcard, sew three of the four sides together.  I increased the stitch length on my machine settings for this project.

3)  Fill the pocket you created in Step 2 with a handful of candies.  The less bulky they are, the better.  I found the large (thinner) conversation hearts and regular M&Ms worked nicely.

4)  Sew the forth side, holding the candy inside.  The back of your postcard will look like this:


I liked the wax paper, because it can easily be opened to get to to the goodies inside, and doesn't require scissors to do so.  However, it does make them a bit more fragile.  I also tried this same idea, using a piece of  fabric netting, and got a nice result.  See the postcard on top in the image below.  This, of course, would require some more effort to get into.

And there you have it!  Another fun and unique Valentine idea :)


Hershey Kiss Rose Valentines


Valentine's Day will be here before you know it.  As much as I enjoy crafting, I am looking for cute and creative Valentines to make for my children to share each year.  This year I decided to go with Hershey Kisses roses, which I remember making when I was a teenager (though I can't say I remember where I had gotten the idea), and Valentine postcards, my own creation.  Here are the instructions...


Hershey Kiss Roses


Supplies Needed (to make 36 roses):
-  1 package of Hershey Kisses
-  36 Floral Leaves, with a stem (one for each rose)
-  roll of Cellophane (I recommend red or pink if you go with silver Kisses, though, you could go with clear if you choose the colored holiday Kisses)
-  36, 6" pieces of 12 gauge wire  (You can buy these in 18" lengths, and cut each into three using a wire cutter)
-  Green floral tape
-  Scissors

Instructions:
1)  Cut your cellophane into rectangles, approximately 7"x5".  You will need one rectangle for each rose.

2)  Take two Hershey Kisses and hold them together, as shown. 

3)  Fold your rectangle of cellophane, matching opposite corners at the bottom, with the Hershey Kisses held tightly in the middle.


4)  Take the excess cellophane from the right side and fold it over to the left, still holding the Hershey Kisses together in the middle.


5)  Fold the excess cellophane from the left side over to the right side.


6)  Twist the extra cellophane tightly to the right below your Hershey Kisses, so your "rose bud" looks like this.


7)  Still holding onto your "rose bud", place your wire "stem" as shown above.


8)  Using a piece of floral tape approximately 10" long, begin to tightly wrap the stem and the extra cellophane.  This can sometimes be tricky to get started, but you can always go over your work a second time with more floral tape to get a tighter, nicer-looking result.


9)  Continue wrapping until the "stem" is well attached to the "rose bud" and the extra cellophane is covered.


10)  Place your floral leaf where you would like it, and use another piece of floral tape to attach it, wrapping until the stem is completely hidden.

11)  Tie on a cute little tag, and you have a one-of-a-kind Valentine to share!

OR....
keep making them, and give an extra special bouquet!
 

Where We've Been Bags - One of our family traditions...


I can't take credit for this idea.  My husband had wanted to get the kids each a big backpack that we could begin adding patches to.  We love camping and exploring new parks, and it seems that patches are easy to come by.  So we surfed the internet until we found the perfect backpacks.  These are big for the kids, but the perfect size for filling with their clothes for our little get-aways... and the straps can be cinched up enough to do the trick.  We found these at an army surplus store in London, Ontario, Canada.  You can find the actual link HERE.

So, every time we stay someplace new, we look for a patch to add to the kids' backpacks.  By the time our children are all grown, we are sure these things will be more than covered with patches.  They will make a for a useful keepsake, and a great way to remember different places we have been together.

I should add, we purchased some patches from e-bay; Camping 2010, Fire Safety, Fun with Nature, to name a few.  Over our summer camping trips we planned activities for the children to earn each patch.  At some point, I'm planning to add a special tag to each bag with their names.

Charlotte (holding Ginger), Tatum (holding Snickers) and Wesley

What unique family traditions does your family share?  I'll be sure to share more of ours over time!


Wesley's Volcano Birthday Cake

My little guy is turning 6 in a couple of days.  My dad had always made our birthday cakes - always different, always unique... and I've tried to do the same for our children.  So, we began searching images of birthday cakes online to get some ideas for Wesley's cake this year.  Let me start by saying, I enjoy baking and cooking, but I am by no means a pro in this department.  So what I've done here I'd have to say anyone can do.  I was pretty happy with the results.


I found a volcano cake posted by a "Wicked Stopmom"... ha ha.. HERE.  I admit, I pretty much tried to replicate what she had created.

Here's how I did it...

Ingredients:
- 1 White Cake, prepared in a 9x13" pan
- 1 Chocolate Cake, prepared in three round pans
-  Chocolate Frosting
-  Vanilla Frosting
-  1-2 cups Graham Cracker Crumbs
-  4 Wooden Scewers (to give support to the stacked cakes)
-  10-15 Chocolate Filled Chocolate Cookies
- 1-2 cups White Chocolate Chips or White Candy Melts
-  Food Coloring: Red and Yellow, or Orange
-  Pirouette Wafer Cookies, from Pepperidge Farm (or similar)
-  Parsley Sprigs, or similar, for trees
-  Candles

Directions:
1)  I took a short-cut... I used two box mixes.
One in chocolate, separated in three bowls of different sizes, and one white cake in a regular 9x13" pan.

2)  I transferred the white cake onto a platter and covered with vanilla frosting.

3)  I then stacked the three chocolate cakes, placing chocolate frosting in between each layer.

4)  I placed 4 wooden skewers through the middle of the cakes to help secure them.

5)  I covered the vanilla frosting with graham cracker crumbs.

6)  I used a knife to shave the edges of the chocolate cake to make it a little more volcano-like.

7)  I took a container of chocolate frosting (again, store-bought) and  put it in a bowl with chocolate filled Oreo cookies.  I used my spoon to break up the cookies, and mix them with the frosting.

8)  I covered the volcano with the chocolate frosting mixture.  A little tricky, but I was able to make it work.


9)  The lava - I melted white chocolate chips in the microwave, added some red food coloring, and realized the chocolate got all chunky and dry.  So I added some cream (half and half) and mixed until it was smooth again.

10)  I poured the chocolate lava over top of the volcano and let it drip down the sides.


11)  I added the Pirouette Pepperidge Farm cookies for tree trunks, the dinosaurs, and had to write "Happy Birthday Wes" over top some left over cookies since the frosting would not stick to the graham crackers (oops).  It did the trick.

12)  We stuck some sprigs of parsley into the cookies to make trees.


13)  And of course, we had to add a bunch of candles to the top of our volcano!  I was so excited about the sparkler candles that I found at Wal-Mart, but they were a disappointment.  As you can see... there is little sparkler action happening here.  We also added a #6 candle down below.


 That is that!  Happy Birthday Wesley!!!

Chore Chart

The craziness of the holidays are now behind us.  Finally, we are setting back into routines, and some of the routines we had been good at following earlier in the school year have slipped somewhere out of sight... perhaps between the couch cushions or under a bed.  It is time to get this one up and running again!

Our Chore Card System


We have several cards for the children to choose from.  Each card has a number in the upper-right hand corner... those numbers represent how many marbles the activities will earn them. As the children complete their chore, they place the appropriate chore card under a magnet on our kitchen door.  That way we can see what tasks the children have selected, and check that they made a decent effort in completing them.  Then, they are awarded the marbles based on the chores they chose to do.


We have three rewards the children can select when their marble jar is full.
1)  $10
2)  Date with mom or dad 
3)  Movie party, complete with snacks of their choice

This system has worked out great for us in the past. There are lots of chores to choose from, and being their choice, the kids don't seem to complain about having to do them.  Plus, it puts some of the responsibility onto the kids and less nagging on mom and dad's part.


If you'd like to use our Chore Cards, you can get them HERE.  I took mine to the copy shop to have them laminated.


Home Baked Donut Recipe

When I was a child, my mother had a donut-baker.  Much like a waffle iron, you'd fill the mold in the donut-baker with batter, close the lid, and soon after we would have warm donuts.  As soon as my children were old enough, I was on a hunt to find my own.  They aren't easy to come by, but thanks to places like eBay and Amazon, it is not impossible to find them.  You shouldn't need to spend more than $30 for a donut maker.


Home-baked donuts have been a favorite at our house for years.  I've created my own "secret" recipe to make them healthier, and they are still gobbled up in no time.  Here is my recipe...


Healthy Chocolate Chip Baked Donuts

Ingredients:
- 1 cup Whole Wheat Pastry Flour
- 1/2 cup Sugar (I replace with an all-natural sugar substitute called SomerSweet)
- 1 Egg
- 1/4 cup Applesauce
- 1/4 cup Ground Flax Seed
- 1 tbsp Baking Powder
- 1/2 cup Milk
- 1/3 cup Mini Chocolate Chips

Directions:
1.  Combine all ingredients in a mixing bowl, and mix until well blended.
2.  If necessary, spray your donut maker surface with PAM.
3.  Drop spoonfuls of batter into each donut mold.
4.  Close the lid, and wait a couple of minutes until donuts are fully baked, and a golden brown.  Enjoy!


Flower Power

I have two girly-girls.  One much more so than the other, but both LOVE to wear fancy flower clips and headbands in their hair each day.  I came across some beautiful hair accessories made from fabric rosettes, and I wanted see what I could come up with.  I found a great tutorial on YouTube HERE.  The Little Birdie Secrets blog also has some great ideas, instructions, and photos.

Here are the accessories that I created.  I used needle and thread and hot glue for most of the construction.  I covered the back with felt, hand-sewing the felt on some, and others I just used to secure the clip to the flower.  Notice that a couple of these are simply made from silk flowers that I removed the stems and extra  bulk from, and glued onto clips.  The girls are thrilled with the results!