Popular Posts

For the Kids Friday #17


Welcome back to another week of fun ideas for the little people running around our lives!  Mine are all camped out in a tent in our basement right now.  Not sure why I didn't do that sooner.  They think I'm the coolest mom ever.  Now, let's see how much sleep they actually get tonight!  :)

Check out these awesome posts from last week's party.  I just LOVE going through them each week.  Thank you so much for stopping by to share with us.  This is definitely one of the highlights of my week.  Can't wait to see what you have to share this week!

If you are featured below, be sure to grab an A++ button to post on your blog!
These features are added to my A++ Features page found HERE.


Sun Scholars


Photobucket
at Little Wonders' Days

at My Kids Make

at Mommy Magic

at Red Couch Recipes

at Crossing the Bugger-Dixon Line


at Divvy Up Diva


And now, let's party!


This Week\


1)  I would LOVE for you to first be a follower of my blog.  (And why wouldn't you want to be?!)

2)  Grab my For the Kids Fridays Button and place it somewhere on your blog.  Be sure to link back to me!

3)  Link up as many KID-RELATED activities, games, recipes, parties, gifts, clothing you've created, crafts, traditions, lessons, and so on... that you would like to share.  Please add a different link each week.  They can be old or new... this is just a place to share ideas for our kids to enjoy.  Bonus points to those that serve some educational purpose too!  Link must be to the specific post, and not your general blog page.  Please don't link to your store.

4)  Share the love and comment on at least one other link.  Everyone loves to get feedback.


That's it!  Have fun, and thanks so much for participating!


Spy Bag Winner

I am excited to announce the winner of the


The winning entry is:


Shannon Longcore said...

The Fire Truck, for my son who is gaga for fire trucks! What a cute idea.

Color Scavenger Hunt

I saw this FABULOUS idea a few weeks back...

Shared at Frugal Family Fun Blog

Wow!  What a great idea (simple and inexpensive) to keep on hand for the summer months.
We had a camping trip coming up, so while I was out stocking up on our supplies for the trip I snagged a handful of paint swatches.

When the kids needed a little something extra that weekend, I set them out on a color scavenger hunt.
No... I didn't do anything fancy like Valerie had with the ring and the cute little punches.  But the great thing about this, is that you don't need to!
I gave each child a paint swatch to match to anything they could locate around our campsite.

They had a ball!


Definitely a keeper!
Thanks Valerie, for such a great idea!

Fancy Flip Flops

Fancy Flip Flops for less than $5!
I just LOVE how these turned out.

My little Tater-Bug turned 4 at the beginning of June. 
She is a fancy little gal, so we had to have a fancy little party for her.

I set up a Fancy Flip Flop Making Station as one of her party activities.  I think all of the girls loved that they were creating their pretty flip flops to wear.

Supplies Needed:
- Flip Flops
- Silk Flowers (I used daisies that easily pulled apart)
- Jewelled Brads
- E6000 Craft Adhesive


Directions:
1)  Prepare Your Petals
Remove your silk flower from the stem, and discard.  Many silk flowers are not held together with glue, so you should be able to remove the petals from the flower center at this point.  One flower will give you several petals.  Have fun mixing and match different flowers or colors.  Set your petals aside.

2)  Build Your Flowers
I found these awesome little brads at Michael's.  They come in several different colors, and they were perfect for the little ones to use when building their flowers.

Once you have chosen a brad, begin layering your flower petals onto the back of your brad.  Encourage the little ones to layer smallest petals to largest.
Another benefit to these brads, is that you can test out your flowers and easily make changes before committing to your final flower.  When you're happy with it, just bend the back of the brad open to hold your petals in place.

Here I am working with a couple of Tatum's friends at the party.

And here is a friend building her flowers.

Make sure to make a flower for each flip flop!  I won't say, make them matching... because who am I to say anyone should color within the lines! :)  But I will say two flowers are always better than one.

3)  Glue Your Flowers On
Note to self... .hot glue isn't always the best choice.  So yeah, I tried the hot glue.  Only to find that as these girls were running through the house we were losing flowers left and right.  I was SO bummed out!


So, my solution?  I re-glued the flowers onto the flip flops using my new best friend, E6000 adhesive.  Have you used this stuff?  Oh my gosh.... LOVE.  Seriously, in love.  When I glued the flowers to the flip flops, I was sure that the brad itself was sealed between and not poking out where it would scratch little feet.
The verdict.... the flowers are still sticking strong after weeks of wear!

Here are the girls showing off their Fancy Flip Flops.
So cute!

I'm really thinking I need a pair.

Diaper Cake Tutorial

My sister's expecting a baby in August.... her 4th GIRL!

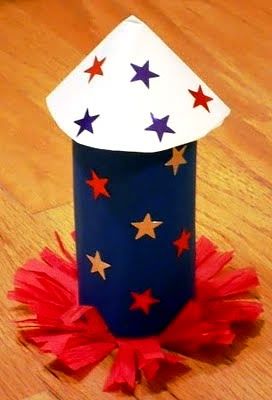
A perfect excuse for me to finally make one of these diaper cakes that I've been admiring for a couple of years now.  So here you have it...


I was thrilled with how it turned out, and that it really wasn't that difficult to put together.

There are SO many tutorials for diaper cakes out there, that I really wondered if I should bother adding my own.

Hmmm..... 


Yeah, I think I will.

My diaper cake contains the following:
(Keep in mind, you can add or omit pretty much anything you like.)
- About 145 Size 1 Diapers
- 6 Baby Wash Cloths
- 4 Onsies
- 1 Hooded Towel
- 4 Flannel Receiving Blankets
- 1 Bottle of Baby Shampoo/Baby Wash
- 1 Tube of Diaper Rash Cream
- 2 Sets of Baby Nail Clippers
- 4 Pacifires
- 1 Super Soft Blanket Toy
- 1 Baby Rattle

Other Supplies Used:
- Ribbon
- Curling Ribbon
- Rubber Bands (about 220)
- Silk Flowers
- Glue Gun & Hot Glue
- Cardboard (Many people use a cake tray instead)
- Cellophane (not pictured, but I used this to wrap the diaper cake up when finished)


Directions
Step 1: Get Rolling!
Begin by rolling each of the diapers you intend to use in your diaper cake.  I thought it would be easiest to secure them with rubber bands than with ribbon like I've seen some people suggest.  Begin rolling on the open end of the diaper, with the back-side of the diaper facing up.  Tightly roll all the way to the end, and secure with a rubber band.


Next, roll some of your smaller items that you can closely match to the size of your rolled diapers.  Here you see the set of baby wash clothes all rolled.

I folded the onsies so that I could roll them to a similar size as well.

Once everything is rolled, you can begin forming your cake!

Step 2: Form Your Cake Base!
Ok... so this may seem really strange, but I found it quite helpful to use my spring form pan to help me get started.  You want to choose a taller item for the middle to add some stability to your cake (and allow you to attach the next layer).  I used a bottle of baby shampoo here.  I then began to tuck my rolled diapers in around the bottle until everything seemed nice and snug.
I tied a piece of curling ribbon around the diapers and knotted it tightly, removed the beginning of my cake from the pan, and added another layer of diapers to those I'd already secured together.  I was working with so many diapers, that this just made it easier to keep them all in place without whipping out the glue gun (which I would have SO DONE had it not rendered the diapers totally useless for my sister at that point).


For the outer layer of diapers I added in a onsie and a couple of the was clothes, to add some color to the cake.  Again, I secured the entire layer by wrapping a couple lengths of curling ribbon around the middle and knotting tightly.  My bottom layer had 91 diapers, 1 onsie, 2 washcloths, and the bottle of shampoo.


Step 3: Form Your Second Layer!
I decided to hide my hooded towel and receiving blankets inside the diaper cake.  So I rolled each of these into similar heights, and tightly secured them around the shampoo bottle from the center of my cake base.  I had to stick an extra diaper into the middle of these to make up for the extra height above the bottle in the center of them all.

Once you have your middle in place, you can begin adding your diapers and other small, rolled items around them.  Again, you will tightly secure them in place using a couple lengths of curling ribbon around the middle.
My second layer had 33 diapers, 2 onsies, and 2 washcloths around the center blankets and hooded towel.

Step 4: Top it Off!
Before I added diapers to the top layer of my cake, I stuck some of the smaller items inside.  I added diaper rash cream and some nail clippers.

And... just as before... add your rolled diapers and other rolled items around until you are happy with the size.  Secure with a couple lengths of tightly knotted curling ribbon.

Step 5: Decorate It!
If you ask me, this is the fun part!!!
I decided to use this yellow ribbon to wrap around the middle of each layer on the cake.  It hid the rubber bands and the curling ribbon, and gave some nice color.  I used hot glue to secure the two ends together.

I then used hot glue to add a thinner ribbon to the middle in a nice contrasting color that matched some of the items I used in the diaper cake.

I had some left over silk flowers from another project which looked so cute.  I hot glued these to the ribbon, and used a softer, light pink ribbon to tie the other items to the diaper cake (the rattle and pacifiers).  We stuck the little blanket toy on top with another silk flower.

Step 6: Add Some Support!
Yeah.. you could do this first.  I chose to do it last because I didn't want my base to dictate the size of my diaper cake.  I wanted to get as many diapers in there as I could.  So I slid my cake onto a large square of cardboard from a box I had on hand.  I traced around my cake, and cut the cardboard to shape.

And here you have it!


And, in case you were curious, my sis loved it :)

Hope you do too!