Popular Posts

Bite Into Summer Vacation!

Ok.. this is it.  Seriously!
You make this... your kids will think that you are the absolute
COOLEST!
Other moms will be talking about you...
and it is certain you will be asked to bring this along to the next get-together.
  

Are you ready for it?


And the best part is, it is SO SIMPLE to make!
Seriously!


My Inspiration...
25490881_DpkvrcvN_c


Shark Snack Attack

Ingredients:
-  1 Watermelon (try to find one with more of an oval shape if you can)
-  Blue Jell-O (2 large, 8-serving pkgs)
-  Fish-Shaped Candies
-  Blueberries (x2 for the eyes)
-  Toothpicks (3 or 4)


Other Supplies I used, though all optional:
-  Tray (I used a pizza pan)
-  Foil
-  Saran Wrap
-  Blue & Green Markers
-  Melon Ball Tool


Directions:
1)  Prepare Your Ocean Water
I followed the recipe for Jell-O Jigglers, found HERE, ahead of time.  I thought that having blue, Jell-O Jigglers would not only make a fun snack, but looks much more like water than the watermelon used in the original photo.  Don't you think?

2)  Prepare Your Tray
I covered a pizza pan with aluminum foil and had my children color the foil with blue and green markers.  We then covered the colored foil tray with Saran Wrap so that the color would be protected.  Remember that your shark will cover a good portion of your tray, so you don't have to completely color it.

And here is the finished tray...

3)  Cut the Watermelon
Wait... first, let me recommend you wash your watermelon.
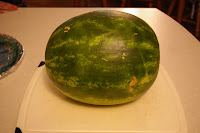
Now, lay your watermelon as shown in the first image and decide which end would make a better shark head.  I opted for the left side with the less rounded curve to it.  Slice off the other end at a slight angle (not too much).

Next, rest your watermelon on it's cut side, and decided where you would like the shark mouth.  Make sure here that you are adding about an inch or so for the teeth you will be cutting out of the rind.  Here, I have cut my shark mouth wedge.  (Make sure to save your wedge for the shark fin!)

Next, with a small knife, carefully score around your shark mouth, only about 2-3 millimeters deep.  This will help you to peal off the rind down to your cut so you can begin to form the teeth.
Can you see my score lines above?

Again, with a small knife, carefully cut away the green rind down to your score lines around the mouth.

4)  Remove the Good Stuff
... and SET IT ASIDE!  We'll be using that in a bit.
I chose to use a melon baller here, but you may choose to take a knife and cut away all of the watermelon.  The melon baller obviously takes more time, but the little balls look so nice I think.

And here we are, with a pile of watermelon, quite a mess I have to say, but a clean shark.  I used a spoon to help scrap the extra melon from around the mouth opening.  It worked nicely.

5)  Cut the Teeth
But before you do that... I rinsed my shark once to get all the sticky off, and set it on some paper towels to help absorb the extra moisture.

Ok... Now this is where it starts to get fun!  Grab a small, sharp knife and cut your jaws as you see me doing below, on the top and bottom of your shark mouth.

6)  Add Gills & Eyes
I used a small knife to cut into the rind (careful not to cut all the way through) to make an eye and the lines for the gills behind the mouth.
Who's mouth is bigger?  Wesley's or the sharks?

I broke a toothpick in half and used that to attach a blueberry to the center of each eye.

And we have an eye!

7)  Add a Fin
Take the wedge you cut to form the shark mouth to make your fin.  Below you will see how I cut my wedge to get a nice triangle fin.

Then I removed the watermelon from the other side.  I placed the fin up to the shark and realized I needed to cut a bit of a curve on the bottom side to have it fit nicely.  You may need to do the same.

To attach the fin, I placed a couple of toothpicks into the shark and pushed the fin into place.

8)  Finishing Your Shark Attack Snack
Transfer your shark to your tray, if you haven't already.
Fill your shark mouth with your reserved watermelon chunks or melon balls.

Next, cut your Jell-O Jigglers into bit-sized pieces, and arrange them around your shark on the tray.

Finish it off by adding some candy fish to the shark's mouth and the ocean water around him.  I didn't do this, but thought some whip cream would even be a fun touch.  Messy, but fun.  :)


And here's your finished snack.
Sure you get a scream at social gatherings this summer!


Watch out for the teeth!

Linking up at TCB and THESE awesome sites.

yummly certified 180x150 Badges

Summer Scholar Sunday #4


Each week, I will feature an activity found in the Sun Scholars Summer Program and share some highlights from our Summer Scholar Families.  We'd love to have you follow along.  If you like what you see, and would like to learn more about my Sun Scholar Summer Program, click HERE.


Beach Bucket Cake
Subjects:    Life Skills & Math
Time:         15+ mins
Supplies:       Yellow Cake, Plastic Bucket (that holds 8-9 cups), Vanilla Pudding, Graham Crackers (1 cup crushed), Chocolate Shells, Plastic Shovel

this is from Week 6 - Beach Party of the Sun Scholar Summer Program

What a fun way to celebrate summer with your children!  This cake in a bucket is SO easy to prepare, you can practically leave the kitchen to your child.  This is sure to be a crowd pleaser!

Directions
      1.       Give your bucket and shovel a good wash before use.
      2.       Tear (or cut) the cake into 2” chunks.  Place a layer of cake chunks in the bottom of the bucket.
      3.       Spread a layer of pudding over the cake chunks.
      4.       Repeat steps 2 and 3 until all the cake has been used, ending with a layer of pudding.
      5.       Sprinkle the crushed graham crackers over top to create the ‘sand’.
      6.       Add some chocolate shells (and perhaps a plastic crab?), your shovel, and dig in!

Tip:  To crush your graham crackers, place them in a Ziploc bag and gently roll over them with a rolling pin until they look like sand.


What have the Summer Scholar Families been up to?


Amy
This week we chose Mice, Cookies & More. We love the Laura Numeroff books and read them over and over. So I knew the kids would really enjoy this week's activities.

The activities we did this week were:
Story Time: If You Give a Mouse a Cookie
Chocolate Chip Math
My Family Portrait Retell the Story
Crazy Crayons
Homemade Cookies & Milk
Chocolate Chip Hunt
Story Time: If You Give a Pig a Pancake, If You Give a Moose a Muffin & If You Take a Mouse to the Movies
Mouse Scavenger Hunt
Write Your Own Story
Color Changing Milk


This was such a fun week for us. The kids loved all the activites, especially those involving chocolate chips. The Crazy Crayons were a great way to use up all our broken crayons, which we always seem to have plenty of. We are going to use the rest to make the Colorful Crayon Sun Catchers today. A great rainy Sunday afternoon activity.

Hopefully the sun will come out to shine through them when we are done.  Princess is a budding artist/author/teacher/doctor, it depends on the day, so she really enjoyed the Family Portrait and Write Your Own Story activities. The Scavenger Hunt and Homemade Cookies & Milk were a big hit with my younger boys. Smash & Dash easily found the items they were looking for thanks to the pictures on the cards.
Handsome thought the Color Changing Milk was amazing and they all did this project over and over. Good thing I had extra milk on hand!

I had a great time this week, all the activities were fun, but I loved the Retell the Story activities. My older two are advanced on their reading levels but really need to work on their comprehension. So, this will be a great activity to use year round. Thanks for the fun week!! We're hoping the weather cooperates for outdoors or beach week next time!!


Melissa
This week for our Summer Sun Scholar Program we used the Unit called Animal Fun!

Story time: We read a story called GORILLAS. It was a non-fiction book that gave us A LOT of details we did not know about these amazing primates!  It surprised the children to know that Gorillas have thumbs and fingers just like we do.  One exercise that I had them do was try to pick up a pencil and write without using their thumbs. It was FUN, hard, but FUN!  They also banged on their chest like Gorilla's do to ward off other animals.    They knew that they could never have a gorilla as a pet.

Lost Pet Poster: For this assignment they had to pick any animal that they imagined as their pet and create a poster to hang up as if the pet was lost.  Molly picked a Cow and called it Molly.  Zachary picked a Cat (our cat) and called him Jobbie (long O sound - our cat).  They created the posters using large sheets of paper, although there are templates in the program to use.  They came out cute!  I put all the "info" on them once they did their animal pictures.

Learning about Animals: This week we studied Ants. While Ants are technically Insects, we used them for this exercise because they already had knowledge of the Ant.  The described the ant by labeling the parts of the ant on a worksheet.  We talked about Fire Ants also and they drew pictures of the fire ants and their nests.

Movie Party Planning: This was a fun activity especially since I had already planned on showing an outdoor movie on our big screen for Memorial Weekend.  I gave the kids a few movies to pick from as our "Now Showing" movie. They picked Toy Story.   We talked about how many children will be inviited and how many bags of popcorn we should make up for them. Zachary suggested we also have juice boxes available.  We made a shopping list of what is needed and we will go on Saturday morning to get all our supplies. (look for pictures to come on this Sunday Morning on our blog)

Additional Story Times:  In addition to the Gorillas we read inthe beginning of the week, I pulled out some simple readers by Scholastic for Zachary to read TO US and show us the pictures. He read several books on animals to us.

This unit was fun and I can see us doing the Movie Party Time assignment over and over several times this Summer!


Heather
Can you believe, I get a note from Heather telling me she had her baby girl last Tuesday, got home Friday, and was hoping to have something to send to us this week?  Oh my goodness..... ha ha.  Heather, I just want to say CONGRATULATIONS to you and your family on your new addition!  Every mom out there will completely understand if you are dedicating your time to your new baby and your family's needs before sending us updates.  We hope you and baby are happy and healthy!


Emily
Homemade Cookies & Milk.  We started the week out by my daughter and son making cookies for the family.  It was a so sweet to see them work together and it was the first time they had cooked all by themselves, I was in the kitchen cooking dinner.  I was able to help out a little, like what a tsp was.

Chocolate Chip Math.  The kids had fun counting the chocolate chips and eating them.  We got a bunch of different kinds, so the kids could add the dark and milk together.  We did this a couple of times this week.  When the kids were getting bored and needed a treat we would count again.

My Family Portrait.  It was fun to see how the kids see our family.  Each picture was so different and loved how they named all the people.  In one picture, I was the smallest person.  I guess size is in the eye of the beholder. 

Learning about Mice.  I really enjoyed the fact sheet that was included in the printables.  I learned stuff I never knew and my sister and kids thought I made it up.

Chocolate Chip Hunt.  This was an afternoon treat, and it was super fun.  When my kids had made the cookies they got to choose what to put in them.  So they choose three different flavors.  It made fun tasting cookies, but the hunt was more exciting then it would have been if I had made the cookies. :)

Color Changing Milk.  My kids really loved this and they asked to do it again.  I was surprised by the reaction of the soup and colors but it was really fun.

This week was fun. We read “If you Give a Mouse a Cookie” and also “If you give a Moose a Muffin.”  We love the moose one more and then the kids wanted to do some of the activities that were in the book.  So we had to have a puppet show.

Sun Scholars

Thanks to the Summer Scholar Families for sharing with us.
We'll see you back next Sunday for more Summer Scholar fun!


Notebook Paper Bag

I am in LOVE with this little bag!


My children and I made these as part of our teacher gifts this year.  Inside, we will include the Summer Checklists they created and a little package of goodies.  I am thrilled with how these turned out!


I'm sharing the tutorial for these cute bags here...
Come Together Kids

Stop by this awesome blog and be sure to check out the other great things Laura is sharing!

Guest Post - Come Together Kids

Today I have a special treat for you!

Hi, I\I am doing a blog swap with Laura, from Come Together Kids.  Laura and I both started our blogging adventure around the same time.  We have so many things in common, it is just crazy!  I absolutely LOVE her blog and the great ideas she is sharing.  Make sure you stop by and see the fun things Laura is doing with and for her kids!

Hi, I'm Laura, from Come Together Kids and I'm so excited to be guest hosting here at Sun Scholars!  I started my blog as a way to share some of the ways my kids and I have come together through crafts, projects, activities and outings.  I hope you stop by to check it out!
Come Together Kids

When you stop by Come Together Kids,
be sure to check out my Summer Fun party!  
Be inspired by the great ideas submitted by others 
and share some ideas of your own!


Come Together Kids


I can't quite remember how I "met" Rachel a couple months ago, but we quickly discovered that our lives were eerily similar.  We both have backgrounds in teaching and education, we both have three young children ( two girls with a boy in the middle!), and we both have very similar tastes in the activities and projects we like to do.  Aside from the fact that I live in Maryland and she lives in Iowa (soon to be China!), it's like we're crafting twins!


Anyway, on to today's project ~ a Beanbag Toss (with a Math twist!)

As a former teacher, I know how easy it is for kids to forget so much of what they've learned when they're out of school for Summer break.  I also know that the best lessons are those when the "learning" is wrapped up in something entertaining.  This fun little beanbag game is a sneaky, yet effective, way to get in a little Math practice while still enjoying your Summer vacation.


The "Equipment"
The game pieces are simple ~ 5 numbered mats and 5 numbered bean bags

How to Play:
( We came up with three versions so far, but there are tons of variations you can play!)

Version One:  Match Up (great number recognition for younger kids)
Spread out your numbered circle mats.  Try to toss each of your numbered beanbags onto the mat with the same number.

Version Two (two or more players):  Add it Up ( fun addition practice)
Players take turns tossing their five beanbags onto the mats, adding up their score as they go.   If the beanbags misses the target, no points. If the beanbag lands pattern side up, you get the number of points on that mat.  If the beanbag lands number side up, you get the points on the mat PLUS the points on the beanbag!  Player with the highest total sum at the end of the round, wins.

Version Three ( one player ):  Race to 50 (awesome mental math practice)
Play with the same point system as Add It Up, but keep playing until you get to 50 ( or 100, 200, or more!)

Trying to hit the target for the most points!


Make Your Own!
(It's really quite easy!)

1.  Cut 10 circles out of felt.  I traced a 9" plate for my circles.

It looks like only 5, but I cut two at a time so there are 10.


2.  Cut 10 five inch squares for your beanbags.  I used felt for one side and a fun fabric on the other.

Oops, the other 4 didn't make it in the picture.  (See, I'm testing your Math already!)


3.  On your computer, find some numbers in a style you like, increase the font to enlarge them, and print them out.


4.  Trace the numbers backwards onto the paper side of some iron-on adhesive ( I like using Heat n Bond Ultra hold for things I'm not going to sew ).  Iron it on the wrong side of the fabric you'll use for your numbers.

You'll want to trace the numbers backwards so they're right side up when you cut them out.

5.  Cut out your numbers and peel off the paper backing.  Iron the smaller numbers onto the bean bag pieces and the larger numbers onto five of the felt circles.


6.  To make the beanbags, put the wrong sides together and sew two seams next to each other around the edges, leaving an opening to fill the bags.


7.   Fill your bean bag with rice.  I found a small paper dixie cup worked even better than a funnel ( Plus my kids took my funnel to play with and never returned it to the drawer!).  You'll want the bean bag full enough to weigh down your bag, but not so full that you can't stitch up the opening.

Filling was much easier with an assistant's help!

8.  Stitch your opening closed, again using two rows of stitches.

See my old sewing machine?  It's as old as I am!

9.  Next, take each pair of felt circles ( one with the number and one plain).  With wrong sides together, simple sew around the outer edge.  ( I suppose you could just use a single layer of felt for your circles if you'll be playing inside, but I found for outdoor use, two layers gives it slightly more weight so it doesn't blow around.)


10.  I decided to make a little storage bag for our game using one of the free little tote bags my husband picks up at conferences and seminars.


11.  Using the iron-on adhesive again, I simply cut a large square of fabric to cover the writing and then made my son's initial since this set is for him ( my girls tend to get all the fun craft projects and my little guy gets left out)


That's it, you're all set!  You have a fun set of beanbags, target mats and a storage bag.   Play a few rounds every once and awhile and you'll be right on target for Math class in the fall.